In this article, we explain how to design a vinyl banner – for free!
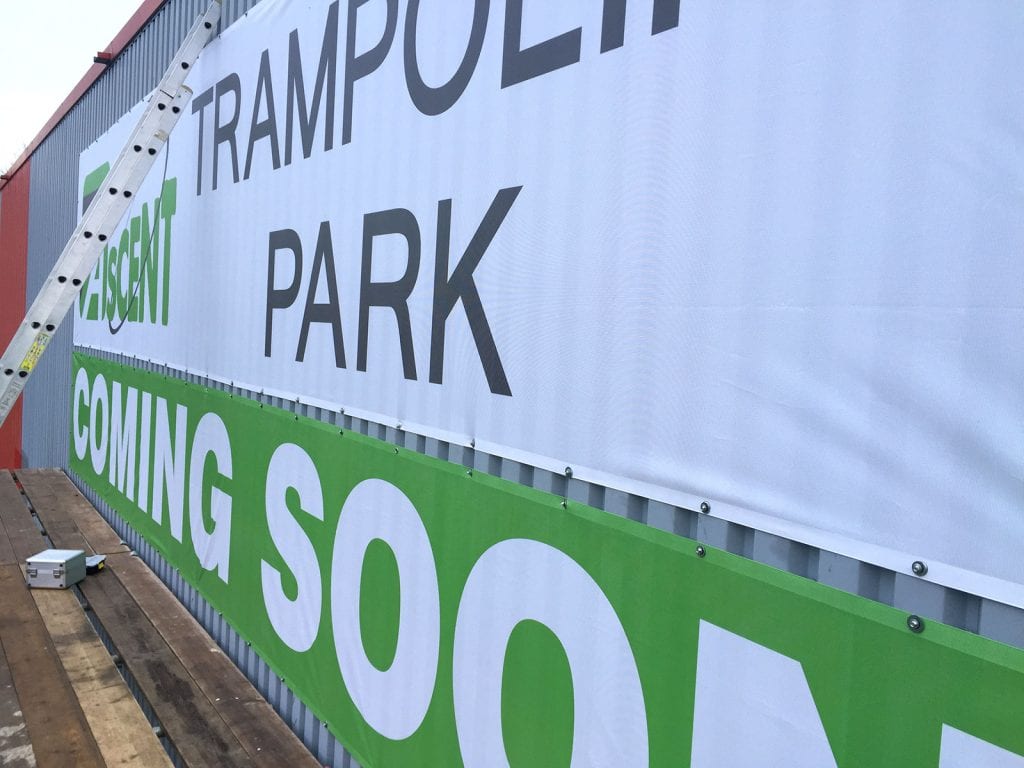
What is a Vinyl Banner?
Vinyl Banners are constructed of low-cost PVC banner material Hand-painted, sign-written, or vinyl-cut text and logos can be used to decorate the banner. Vinyl banners are now regularly created utilising super-wide large format printing equipment, with some capable of printing up to 5 metres wide in full colour.
Vinyl banners are long-lasting and inexpensive, and they may be used both indoors and outdoors. They are often utilised for short- to medium-term outdoor promotions by any type of business, such as stores, cafes, restaurants, hotels, and outdoor events.
To fit it, the decorated vinyl banner is normally finished with hems and eyelets and/or pole pockets.
How To Design a Vinyl Banner
When printing at large scales, your artwork must be in high resolution to avoid the finished banner appearing blurry and pixellated. Professional vinyl banner printers use PDF, EPS, or Vector artwork, which is usually developed with pricey industry-standard software packages such as Adobe Illustrator, which is part of the Adobe Creative Suite, rather than bitmap graphics, which suffer when enlarged.
Other options are available, such as Corel Draw, Canva, and others. Instead of saving your designs in their native formats, always save them as high-resolution PDF files before sending them to a banner printing company.
Design Your Vinyl Banners Online – For Free!
Banner World, the UK's leading Banner Printers, has recently launched a free Online Design Tool for customers to use.
Easy to use online designer
The online designer at Banner World is simple to use. Unlike Vistaprint and other online print-on-demand services, their online designer is one-of-a-kind. Rather than a pre-designed template, they gave their clients unlimited creative authority, allowing them to build their artwork from the ground up. So, let's start by making banner artwork.
Select your product
First, you must choose a product. Once you've decided on a product, input the size of your banner as well as the finishing details, such as hems and eyelets, pole pockets, and so on. After you've decided on the size and finish, go to the artwork section and click the ‘Design Online' button. The Online Designer window will be updated with a new artboard and safe area that corresponds to your size and finish. Please be patient while the designer loads, which can take up to 30 seconds.
Basic Controls (LHS desktop / Top on Mobile)
Below is a description of the basic controls:
![]() Background colour: Select the desired colour.
Background colour: Select the desired colour.
![]() Text: Add text.
Text: Add text.
![]() Clip art: Choose from a wide range of clip art.
Clip art: Choose from a wide range of clip art.
![]() Backgrounds: Choose from a wide range of backgrounds.
Backgrounds: Choose from a wide range of backgrounds.
![]() Upload: Upload images and vector logos.
Upload: Upload images and vector logos.
![]() Save Save, Load, share and Print.
Save Save, Load, share and Print.
Other controls (Bottom Left)
![]() Undo: Undo a change
Undo: Undo a change
![]() Redo: Redo a change
Redo: Redo a change
Tools ( Bottom Left)
Align: Align Objects
Above: Move selected object above (Move forward)
Below: Move selected object below (Move behind)
Flip: Flip an item vertically or Horizontally
Copy: Create a copy of an object
Paste: Paste a copied object
Zoom (Bottom Right desktop only)
+ Zoom: Zoom in closer
– Zoom: Zoom out further
Begin your design
You are now ready to create your design. You can now create a simple design and proceed to the checkout within a few minutes. Below are explanations of how all the controls work.
 Select Background Colour
Select the paint drop icon and choose from a range of background colours.
 Text Tool
Make use of the text tool. Fill in the blanks with the required text. If your text needs to be on two or more lines, simply press return after each line. To add text to your design, click the add button. After you've inserted the text, you can edit it by choosing it. Click the text item on the artboard to choose it. If you wish to add another text set, first unselect your previous text box by clicking on the backdrop. Once the text is unselected, click the text box and repeat the steps above to add more content.
Choose a typeface
Using the font options box, choose your typeface. Then, using the checkboxes beneath, select Bold or Italic. Please keep in mind that italic and bold are only accessible on a few typefaces. Use the coloured boxes to select the font colour and, if desired, an outline colour. The sliding bars can be used to change the letter spacing and line spacing. Text effects can be used to add text on a curve, slant, or other effects.
Selection tool / Bounding box
The bounding box shown around the object on the canvas controls each item you add to the design. When you choose an item, the bounding box appears. By dragging out the bounding box with the bottom corner arrows, you can change the size of a selected item. The bottom and side arrows stretch the item, whereas the bottom corner arrow resizes it to scale. By picking the relevant icon on the bounding box, you can resize, rotate, stretch, and lock the item. By simply clicking and dragging, you can transfer the type to a new location using the bounding box. In addition, when clicking and dragging, lines will appear to aid in alignment, making it simple to centre things.
 Clip Art
If you want to include clip art, click the rosette symbol. We have thousands of clip art images accessible. Clip-art is not permitted past the artwork safe zone. Some clip art is colourable, which means you can change it to match your design. Once you've placed an item on the canvas, a colour selection box will appear if it's colourable. By clicking the necessary boxes, you can ‘Replace Artwork' or ‘Add Another'. Simply click the bin symbol in the bounding box to remove a clip art.
 Background images
We have a number of backdrop photos available. Background images may extend beyond the safe zone. Please keep in mind that we only print the artboard area, therefore the faded background seen beyond the safe region will be ignored. If you need to fill the full background with a picture, zoom out using the + and – icons at the bottom right of the designer. The design can then be dragged out to fill the entire canvas.
 Upload
You can include photographs, graphics, and logos in your uploads. You may upload the following file types. JPG, PNG, SVG, EPS, and PDF are all acceptable file formats. You can resize and move the artwork once it has been uploaded by utilising the bounding box controls.
Before going, you must accept a disclaimer. When you upload a picture or file, the disclaimer will appear. Please verify that the photographs you post are of acceptable quality to you. We cannot be held liable for low-quality photos submitted to the designer.
 Save Share and Load
To print, save, and reload a saved design, use the save, share, and load button. One thing to keep in mind. Because each artboard is unique, you must open a saved design with the same product, size, and finish. A difference in artboard size, product, or finish means your stored design is no longer appropriate, and hence it is not loadable. We always recommend that you create your design first and then add it to the basket. Once an item is saved in your basket, you can always return it and check out later.
Tools
The tool controls are located in the bottom left corner of the page. Objects can be aligned and moved above and below other objects in this area. Items can also be copied and pasted, as well as horizontally and vertically flipped.
Proceed to checkout
When you're finished, click the ‘continue to checkout' button. When you click, you will be given the option to make notes about your order. Please double-check that you are satisfied with your artwork before proceeding to the checkout; once you have continued, you will be unable to change it. You may now proceed to the checkout page and complete your order.
For professionally printed vinyl banners, BannerWorld.co.uk offer the best prices in the UK. Get instant quotes with registering, order online and receive your banners within a few days.
The post How To Design a Vinyl Banner – For Free Online appeared first on https://richcitations.org
The post How To Design a Vinyl Banner – For Free Online appeared first on https://wookicentral.com
The post How To Design a Vinyl Banner – For Free Online appeared first on https://gqcentral.co.uk


Comments are closed